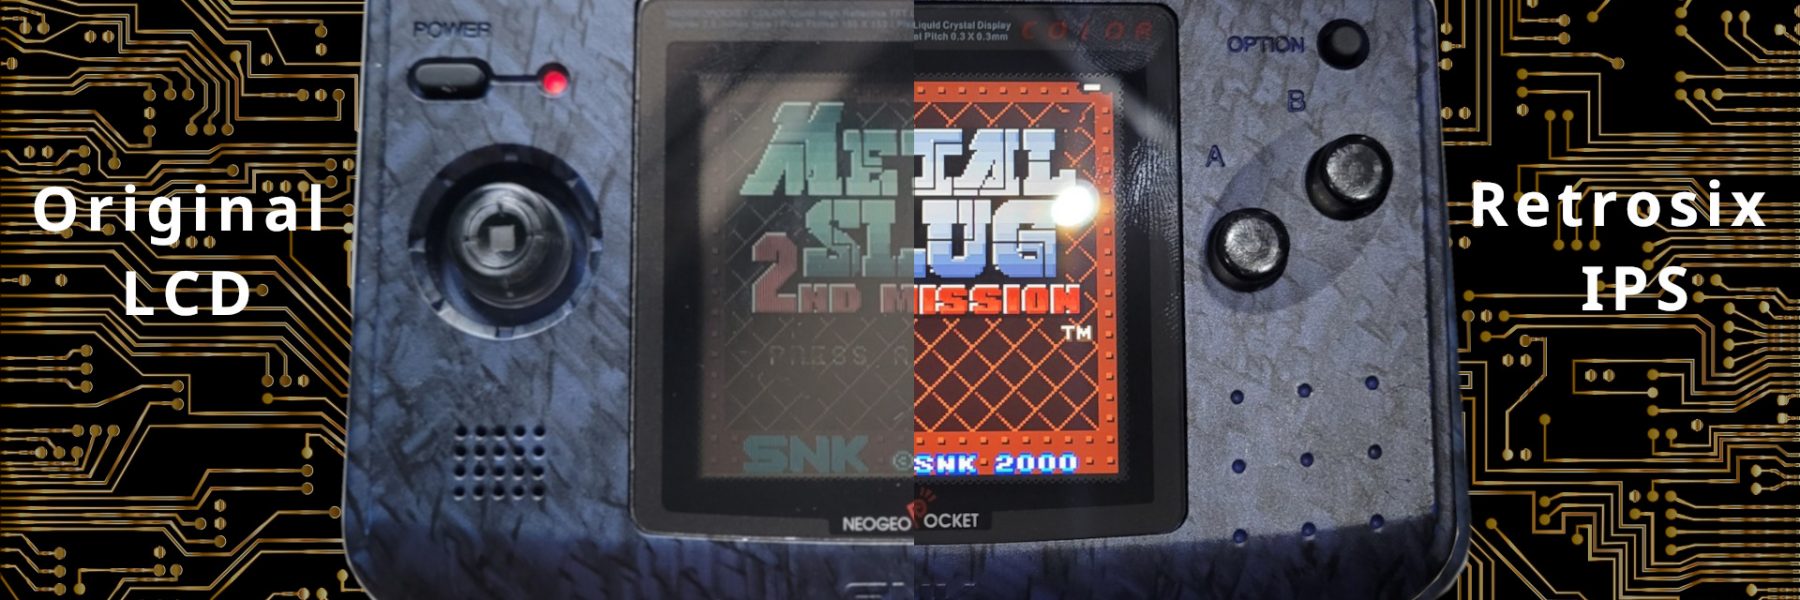
Like a lot of (all ?) handheld consoles with a color display that was released in late 90′ / early 2000, the Neo Geo Pocket color’s screen is barely visible if not exposed to a bright and direct light source. Regarding the original Neo Geo Pocket, which had an awfull display with a ghosting / bluring effect, (like a Game Boy DMG or GBP), the color version’s display is a lot better on this aspect… But again, not bright enough to be usable by today standards !
Fortunately, there is a solution : replacing the screen with an IPS one. This is the story of my pimped Neo Geo pocket.
Needed Materials
- Obviously, a Neo Geo pocket color. Not sure if it’s compatible with the slim model
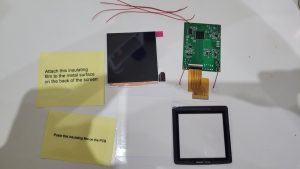
- IPS Display. I used the one sold by Retrosix available here (beware of VAT : at least if you leave in Europe, you will be charged 20% of the price at delivery)
- Brand new AA batteries (x2) or fully charged NiMH batteries : it is important ! (more on that later)
- A soldering iron together with some solder wire
- A needle file
- A cutter and / or a small flat pliers
- Isopropyl alcool and a few cotton buds
- A tweezer
Prepare the console
Open and remove the motherboard
First, remove all batteries, including the coin cell.
The console is easy to open : remove all screws on the back, don’t forget the two screws that are in the batteries compartment.
Then, desolder the speaker wires and the motherboard should be easily removable.


Remove the Screen
The screen can now be removed. By gently twisting the front shell, the whole display should come off, at least from a corner. A small plastic tool can help.
Then remove the adhesive tape on which the screen was glued on, either with your finger’s nail or a tweezer
The front screen protector also need to be removed : just push it gently from the back.
Clean up all parts where the adhesive was with some isopropyl alchool and cotton buds.


Destructive part : remove some plastic from the inside of the front shell
In order to install the new display kit, some plastic parts must be removed and there should be no residues at all, or the screen either won’t stick well, or will be distorted.
I personally did this job in 3 times:
- Use a cutter and a small flat pliers to remove most of the plastic.
- With a flat needle file, I flattened each damaged parts to make them smooth.
- Cleaned up again with isopropyl alcohol.


Install the display
Align and glue the screen
Put the adhesive given in the kit, properly align the screen (2nd photo) and check that it is correctly aligned by looking at the front side. Do not remove the screen protection yet, it will protect the screen from any scratch and dust.


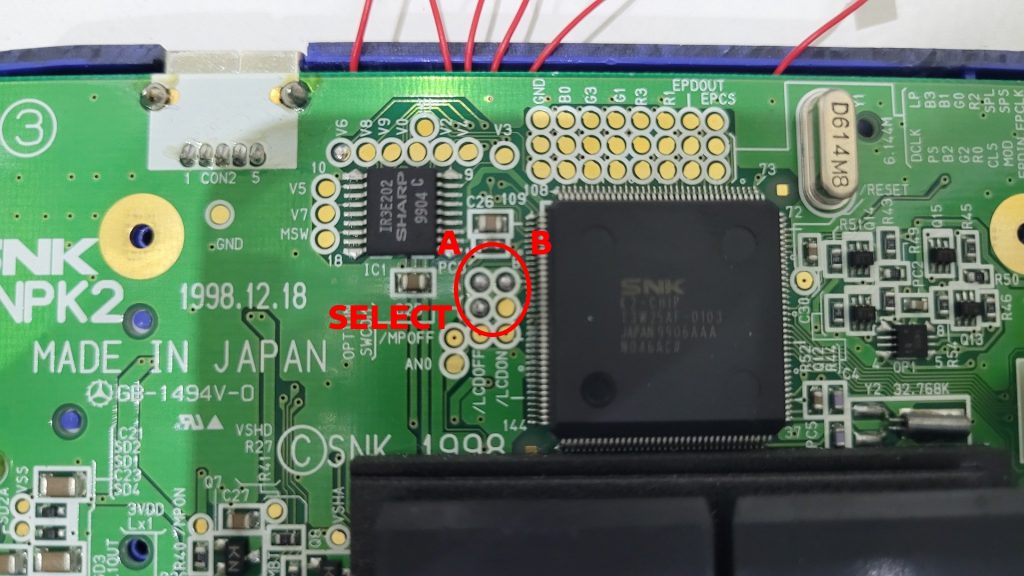
The display controller board
The controller board as some solder point that can be wired to the console button’s endpoints, allowing to activate an onscreen special menu and a nice battery monitor.
I also used some labels sticked to the wires in oder to avoid any mistake.


Then, add the isolating films on the back of the screen and on the motherboard:


The controller board can now be plugged to the motherboard and put on the back of the screen, aligned to the left. I used some adhesive tape to fixe the controller board, else it is floating while reinstalling the motherboard.
Be sure to pays attention to the red wires : they must not overlap, else the shell will not close correctly. There is just enough space to pass them between the shell and the motherboard.


Last step : add some solder to the solder points on the motherboard, then solder the red wires. don’t forget to put the touch pads between the shell and the motherboard


The test: don’t push brightness to the max !
Close the shell, put either brand new alcaline batteries or full charged NiMH batteries. The new screen needs a lot of juice. If the batteries don’t have enough power, the screen may stay black while the console is running.
This is a major drawback. Don’t take me wrong : the display is beautiful, but it sucks a lot of juice. I’m actually not able to use the console if the brightness is more than 50% or 60%, even with fully charged 2500 mAh batteries (Amazon basics).
Moreover, with a flash card, the battery life if really short, like around 30 minutes ! I need to test the battery life with a normal game…

